Showing posts with label DIY. Show all posts

Wednesday, March 26, 2014

BM Archives :: Fresh Ways to Display Spring Flowers

I hope you are well on this fine Wednesday! Today I'm sharing a post that's sure to inspire you throughout each season, especially Spring and Summer. What other ways do you enjoy displaying flowers?

While I enjoy having vases of flowers in my apartment year round, I especially look forward to springtime, when some of the most beautiful flowers are in bloom. My moms garden is always filled with colorful flowers and I love bringing a bunch home with me whenever I visit. I also like picking up flowers at our local farmer's market...or even the grocery store! This season, instead of putting flowers in just any old glass vase, why not display them in a new way? Here are some simple ideas and quick DIY tips on creative ways to showcase your fresh blooms.
{LOVE this idea! Wrapped soda bottles in pretty paper and twine. Image via Decor8}

{Hanging flowers in vintage bottles with rope or twine - a great idea for your patio or garden. Image via}

{Simple and so pretty - a single flower in a mason jar. Image via}

{A collection of white vessels lined up along a window sill with large flowers. Image via}

{Container wrapped with brown paper and twine, stenciled with a simple design. Image via}

{How gorgeous is this? A simple white tray filled with a variety of flowers and glass vases in all shapes and sizes. Image via}

{A vintage teacup filled with roses. So cute for a desk or small table. Image via}

Thursday, February 13, 2014

5 Sweet DIY Valentines Craft Ideas

Valentines Day is tomorrow and some of you may be looking for last minute ideas on ways to surprise your significant other with something special. Here are 5 simple DIY projects that are thoughtful and original. Feel free to share any other special DIY's you know of for this special day!

Button Burlap Heart Canvas 
 IMAGE CREDIT AND DIY INSTRUCTIONS VIA SOUTHERN LOVELY

 Romantic & Sweet Deck of Cards

 Date Night Cards
VIA BROWZER

 Seasons of Love Cards 

 Key Homemade Valentine

Friday, December 20, 2013

BM Archives :: Personal Project - Entry Photo Wall

Happy Friday! I'm wrapping up the week with an archived post from earlier in 2013 that many of you really enjoyed. It's fun reflecting back on the last year and I really enjoyed tackling this personal project. Of course by now, I'm ready for a change and will be re-vamping this wall in the new year... 
Good luck with those of you who are doing last minute Christmas shopping (myself included)!

[Repost] Last weekend was one of those weekends where I was super productive and tackled a bunch of little projects on my never-ending to-do list around the apartment. I re-organized the kitchen cabinets, donated bags of things we never use but were taking up precious space and finally finished our entry photo wall! I painted this wall about a year ago and hung a few frames but it never looked right to me. For months I've been staring at this wall, chomping at the bit to really do it right. Here are a few notes on how I created this photo wall. I plan on switching out the photos every 6 months to keep things fresh and interesting. Let me know what you think! Do you have any plans for updating your entryway this year?

I painted the main entry wall this amazing shade of gray from Benjamin Moore (which I can't find the name of at the moment but will update this post as soon as I do!) I didn't really have a layout in mind on how to hang each piece, but I started with this larger piece first and worked around it. I had all of the frames laid out on the floor and hung them sort of like pieces of a puzzle as I went along - holding up different sizes to see what worked before mounting them with a nail and picture frame wire (although there are quite a few extra holes in this wall with my "eyeball" method!).

I wanted to mix it up and have more than just frames, so I incorporated a few pieces of art (from Homegoods) and small round gold mirrors, which breaks up all of the photos.  Most of the frames are from Ikea and are in all different finishes, which gives the wall an eclectic feel. Tip: don't fill the frames until after you've hung the entire wall so you have more flexibility on the direction to hang the frame (horizontal or vertical). It's extra work but worth it!

A shot of our front door - as you can see, our entryway is very small and the kitchen is just to the right. Even though it's just an apartment, I really wanted to make our entry dramatic and fun. I hung the frames high on the wall to give the illusion of higher ceilings.

Details of frames in all different finishes, which works well.

I know it's very "Friends" from the 90's, but the glass broke in this gold frame so I decided to make use of it by mounting it to the door (I used these awesome Hanging Strips from the Command).

Now that the wall is complete, I'm realizing that we need a floor runner in a fun pattern, maybe with some color, to complete the look. I'll add that to the list!
******* 

Tuesday, December 17, 2013

BM Archives :: Tabletop Style - Dramatic Runners

I'm heading out to Arizona to install a job and have had very little time to blog, let alone Christmas shop and all the rest that comes during this crazy time of year! As we approach 2014, I thought I'd share some of the more popular posts I published on Belle Maison throughout the week. Enjoy!

[Repost] I loved Adore Home's editor Loni Parker's 30th birthday party theme, which was featured in the online magazine last April.  The decor and color scheme is simple, elegant, fresh and feminine.  The best part is that the gold chevron table runner is actually wallpaper! I never would of thought to use wallpaper to decorate a tabletop, but what an incredible idea. Most wallpaper rolls are about 21" wide, making it the perfect size to run down the center of a dining table - no cutting, gluing or sewing necessary. There are thousands of beautiful wallpapers out there to choose from in all different price ranges - the sky really is the limit with the design of your next party! As I looked around Pinterest, I found a couple other dramatic tabletops (both fabric) that give even more inspiration on what a pop of bold pattern can do for a table setting. What do you think about this idea?

[IMAGE SOURCE: ADORE HOME MAGAZINE]

 [IMAGE SOURCE VIA PINTEREST]

 [IMAGE SOURCE: STYLE ME PRETTY]

*******

GET THE LOOK


Monday, November 18, 2013

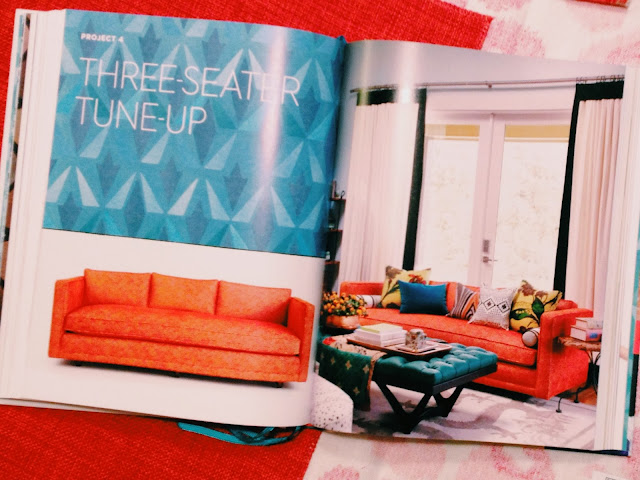
Book Review: Spruce Upholstery & Design by Amanda Brown

One of my favorite things to do here on my blog are book reviews. I have a gazillion design books stacked all over my apartment and couldn't be more thrilled to add this one to my ever growing collection: Spruce, A Step-by-Step Guide to Upholstery & Design, written by the fabulous Amanda Brown. Amanda is the founder and owner of Spruce, a custom upholstery shop in Austin, Texas. If you love upholstery and/or want to learn more about the topic, DIY projects and design, this book is for you! This book will walk you through five advanced projects that will collectively teach you how to tackle any modern-day upholstery project, along with how to make custom pillows and more!

Book Review

I really enjoyed reading Amanda's personal story on how she went from knowing nothing about reupholstering a piece of furniture to quitting her day job and starting her own business that has become wildly successful. I have an obsession with wanting to makeover old thrift shop chairs and ugly old sofas, but don't have the slightest clue on how to do so. I look forward to learning more from Spruce and hopefully tackling my very own DIY upholstery project one day. Get your copy here and happy upholstering!


[All images were taken by me of the inside of my copy of the book Spruce, by Amanda Brown]


Check out the other exciting reviews by bloggers 
for the official "Spruce Blog Tour":

Friday, July 19, 2013

DIY Project :: Gilded Pocket Tee

Hello lovely Belle Maison readers! It's Lou here, one half of the blogging duo from Lynn + Lou. I am so pleased to be contributing on Belle Maison today. Since the heat of Summer is upon us, I wanted to share my go-to outfit for Summer and I figured I would share a little DIY to go along with it.

During these hot months I love experimenting with different versions of cut-off shorts and over sized tee's. It is such an easy, no-hassle outfit and it is perfect for Summer. However, I wanted to try giving one of my basic tee's a face lift and I love how it turned out.

Materials:
1 Over-Sized Tee
4 x 6 in Swatch of Gilded Leather or Sheepskin
Thread
1 Tape Measure
Scissors

Directions:
1. Find a plain over-sized shirt, pre-wash and dry the shirt.

2. Cut a pocket shape out of your gilded fabric and pin it 9-12 inches from the shoulder, depending on your bust size and how low you prefer the pocket.
3. Sew the gilded fabric onto your shirt creating a pocket, removing all of the pins as you go.
4. To wash your shirt properly, hand wash it, avoiding the gilded pocket as much as you can.

I paired my gilded pocket tee with my favorite cut-offs. I found a pair of boyfriend jeans at a nearby thrift store and thought that they would be much better with a little snip, snip. Two folds later and I had my favorite Summer shorts. I definitely recommend a pair, you would be amazed at how versatile these shorts are and how many outfits they complete.

I topped everything off with dream catcher earrings, gold accessories, my favorite vintage La Mer watch and platform sandals. I kept my hair nice and simple with a top knot. Which was by far the best beauty creation, so easy, versatile and adds the perfect finishing touch to any ensemble.

For more crafts, food and fashion inspiration follow me on Lynn + Lou. Have a lovelyThursday!
Cheers!
Lou  

Tuesday, June 25, 2013

Blog Spotlight :: Young House Love

I recently began subscribing to HGTV magazine and love it! As a magazine hoarder/junkie of way too many subscriptions every month, HGTV mag is quickly becoming a favorite. The last two issues have been packed with quality DIY ideas (not cheesy ones), inspiring interiors & home tours, decorating tips, and much more. The July/August 2013 issue featured the couple who writes the super popular blog, Young House Love (am I the only person on the planet who's never visited their blog?...they get 100,000 visitors daily!). Sherry and John Petersik are a cute young couple with a 3 year old daughter who have turned their blog into a full time career. They've featured hundreds of their own DIY projects, along with decorating advice, DIY videos, and more. I can't get enough of looking at before and after photos of DIY projects - it always amazes me at how much you can transform something with paint alone - and their blog is filled with awesome transformations, which they've all completed around their own home. If you're looking for an inspiring new blog to read, then you must check out Young House Love immediately! Enjoy and feel free to leave a comment on any other blog(s) you're obsessed with lately.

 [DIY Upholstered Headboard via Young House Love]

 [Front Door Makeover via Young House Love]

 [Complete Kitchen Remodel via Young House Love...you've got to see the before photos of this kitchen! The Petersiks did an incredible job making this over themselves]


 [DIY Painted Chair & Upholstered Cushion via Young House Love - this beauty was snagged from a second hand store for under $50]

 [DIY Postcard Shelves via Young House Love]

Friday, June 7, 2013

'Five Things' Friday

Hello weekend! Today's round-up of my 'five things' is a mix of some of my latest Pins. I've felt a little uninspired lately and the following images have given me a little pep back in my design step! What's inspiring you lately?

One. This DIY stenciled china cabinet backing was done using foam board instead of actually stenciling the back! Genius, right?! Find out the details on Burlap & Blue.

Two. Aqua and coral is one of my favorite color combinations and this bedroom pulls it off perfectly 

Three. DIY Ottoman - this ottoman was made using a couple box cushions, or you can use floor or sofa cushions, a piece of wood cut to size and four casters. Simple enough. I'd love to try this out for my apartment living room (adding it to my never-ending DIY weekend project list). [Image Source]

Four. For whatever reason, this place setting instantly puts a smile on my face! Maybe it's the mix of Greek key with chevron - two of my favorite patterns, along with the scalloped gold charger and monogrammed detail on the place mat. A perfect mix of classic and modern styles. [Image Source]

Five. This rustic dining room is so dreamy and inviting. What a great space to share meals and great conversation with family and friends! [Image Source]